| Wiki Sections |
|---|
| AWS FreePBX |
| FreePBX General |
 TheWebMachine Networks Support Wiki
The Home of AWS FreePBX® - A division of Rebar IT Outsourcing
User Tools
Site Tools
Sidebar
aws_freepbx:ssh_connection_tutorial
Table of Contents
SSH Connection Tutorial
Connecting from a Linux or Mac using SSH client
If you are a linux or Mac user, simply connect using the typical method, using your .pem keyfile and this command, substituting your own DNS name or Elastic IP after the @ symbol:
ssh -i my-key-pair.pem ec2-user@123.45.67.89
Connecting from Windows Using PuTTY
After you launch your instance, you can connect to it and use it the way that you'd use a computer sitting in front of you.
NOTE: After you launch an instance, it can take a few minutes for the instance to be ready so that you can connect to it. Check that your instance has passed its status checks - you can view this information in the Status Checks column on the Instances page.
The following instructions explain how to connect to your instance using PuTTY, a free SSH client for Windows. If you receive an error while attempting to connect to your instance, see Troubleshooting Connecting to Your Instance.
Prerequisites
Converting Your Private Key Using PuTTYgen


Starting a PuTTY Session
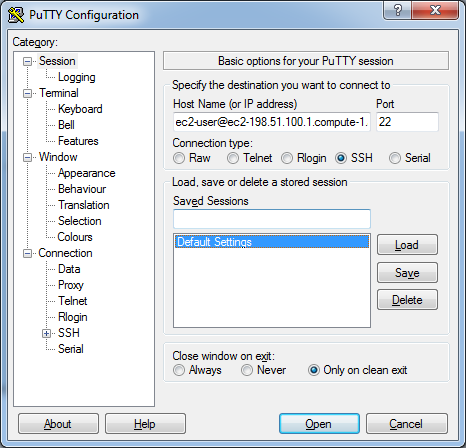
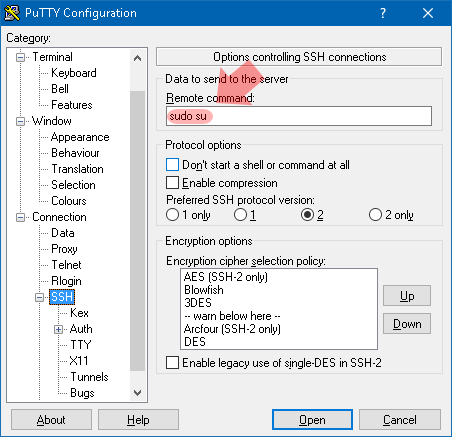
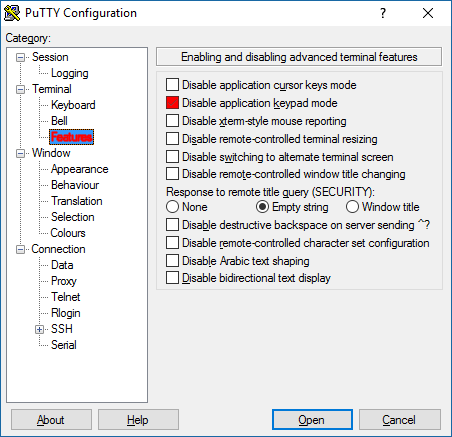
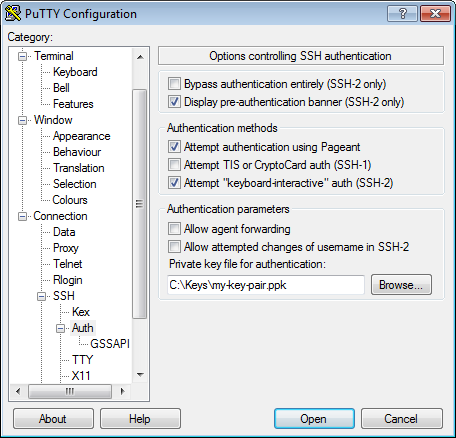
ONCE YOU'VE CONNECTED
You'll initially be connected as the unpriviledged ec2-user (unless you configured the Remote Command in PuTTY) and you will see the following message. NOTE THE $ AT THE END OF THE PROMPT, which denotes an unpriviledged prompt.
Linux ip-172-31-72-198 6.1.0-44-amd64 #1 SMP PREEMPT_DYNAMIC Debian 6.1.164-1 (2026-03-09) x86_64
       ___        ______    _____ ____  _____ _____ ____  ______  __
      / \ \      / / ___|  |  ___|  _ \| ____| ____|  _ \| __ ) \/ /
     / _ \ \ /\ / /\___ \  | |_  | |_) |  _| |  _| | |_) |  _ \\  /
    / ___ \ V  V /  ___) | |  _| |  _ <| |___| |___|  __/| |_) /  \
   /_/   \_\_/\_/  |____/  |_|   |_| \_\_____|_____|_|   |____/_/\_\

AWS FreePBX is distributed by TheWebMachine Networks, an Authorized
Sangoma Partner. Redistribution of this AWS-specific image is prohibited.
AWS FreePBX includes Technical Support from TheWebMachine Networks as
part of your subscription to the product.

   -=- See https://www.thewebmachine.net for details and support! -=-

-=-=-=-=-=-=-=-=-=-=-=-=-=-=-=-=-=-=-=-=-=-=-=-=-=-=-=-=-=-=-=-=-=-=-=-=-

YOU ARE CURRENTLY RUNNING COMMANDS AS ec2-user (UNPRIVILEGED)!

MOST COMMANDS, INCLUDING 'fwconsole' AND 'smartupgrade' REQUIRE FIRST
ELEVATING TO ROOT WITH:

     sudo su

(A root prompt starts with 'root' and ends with the '#' symbol.)

ec2-user@ip-172-31-72-198:~$ sudo su
Simply execute sudo su and you'll be elevated to root. NOTE THE # AT THE END OF THE PROMPT, which denotes a root prompt:
       ___        ______    _____ ____  _____ _____ ____  ______  __
      / \ \      / / ___|  |  ___|  _ \| ____| ____|  _ \| __ ) \/ /
     / _ \ \ /\ / /\___ \  | |_  | |_) |  _| |  _| | |_) |  _ \\  /
    / ___ \ V  V /  ___) | |  _| |  _ <| |___| |___|  __/| |_) /  \
   /_/   \_\_/\_/  |____/  |_|   |_| \_\_____|_____|_|   |____/_/\_\

AWS FreePBX is distributed by TheWebMachine Networks, an Authorized
Sangoma Partner. Redistribution of this AWS-specific image is prohibited.
AWS FreePBX includes Technical Support from TheWebMachine Networks as
part of your subscription to the product.

   -=- See https://www.thewebmachine.net for details and support! -=-

-=-=-=-=-=-=-=-=-=-=-=-=-=-=-=-=-=-=-=-=-=-=-=-=-=-=-=-=-=-=-=-=-=-=-=-=-

YOU ARE CURRENTLY RUNNING COMMANDS AS ROOT!

Updates can be performed by running:

     smartupgrade

...BUT FIRST CREATE A MACHINE IMAGE BACKUP VIA THE EC2 CONSOLE -BEFORE-
RUNNING SMARTUPGRADE!!!    Please see https://twm.tips/su for info!


root@ip-172-31-72-198:/home/ec2-user#
You'll also notice a green bar appear at the bottom of your session. This is 'tmux', a screen multiplexing client that allows, in this case, for persistent SSH sessions in the event you get disconnected while running a long command. Simply reconnecting will return you to this session and your running command or it's final output.

Now you can run advanced commands or update your instance with our SmartUpgrade client. You can find out more about SmartUpgrade here.
aws_freepbx/ssh_connection_tutorial.txt · Last modified: by TheWebMachine Networks
Page Tools


