Table of Contents
Outbound Call Announcements
Sometimes you want to play an announcement to your users before completing certain outbound calls, such as those to international or long distance numbers that might incur extra costs for your company or department. There is no direct manner for accomplishing this in FreePBX, but this guide will show you a relatively easy work-around to accomplish the same goal.
Here is a summary of steps you will complete in this guide:
- Create the following:
- Misc Destination: *999${CALLERID(dnid)}
- System Recording: your announcement audio
- Announcement: your announcement that includes the new recording, then pass to new Misc Dest
- Outbound Route: include your trunks and *999|[.] as the only dial pattern
- Modify the following:
- Original Outbound Route: remove your trunks and change Congestion Destination to new Announcement
We assume that you already have an Outbound Route in mind that has the Dial Patterns you wish to match to play the warning message.
Create Misc Destination
First, we will want to create a new Misc Destination that alters the originally dialed number (temporarily). This essentially tags the call for retrieval by the new Outbound Route we will create in a later step. Navigate your FreePBX GUI to Applications > Misc Destinations and click Add Misc Destination. Include the following details:
- Description:
Pass to Trunk - Dial:
*999${CALLERID(dnid)}
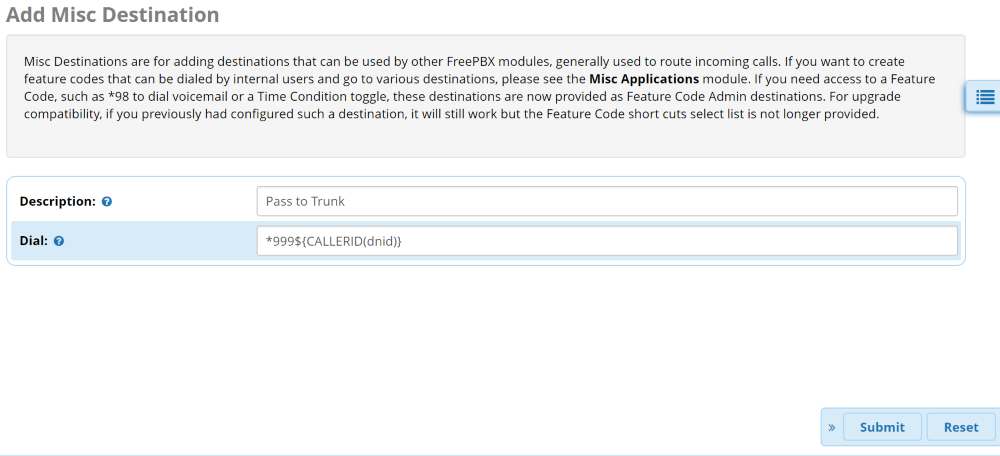
You can use whatever name you want for the Description. You can also use something other than *999 in front of the {CALLERID(dnid)}. Just be sure the digits you choose aren't in use by another Feature Code or Dial Pattern, you maintain the {CALLERID(dnid)} portion, and note that it is CaSe SeNsItIvE. You'll also need to substitute the same alternative in the new Outbound Route you will create in Step 4 below.
Submit this new Misc Destination and move on to the next step. Do NOT Apply Config yet.
Create New System Recording
Next you will navigate to Admin > System Recordings and create your new announcement to be played to users. We won't go into detail on how to create a new System Recording. You can follow this guide here if you are new to this:
https://sangomakb.atlassian.net/wiki/spaces/PG/pages/20578785/PBX+GUI+-+System+Recordings+Module+User+Guide
Once you have created your new recording, Submit and move on to the next step. Do NOT Apply Config yet.
Create New Announcement
Now navigate to Applications > Announcements to create a new announcement using the Recording you just created in Step 2. Set the Destination After Playback to the Misc Destination you created in the first step. Ensure all 3 toggles on the page are set to No.
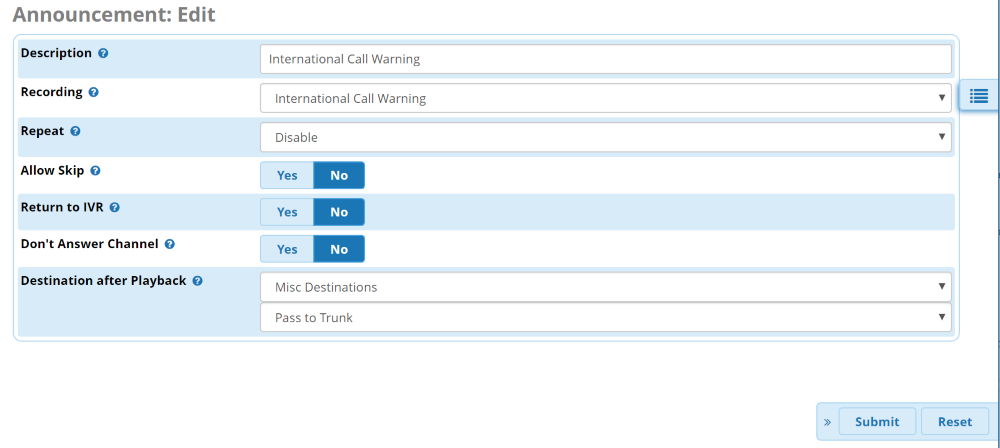
Once you have entered the information, Submit and move on to the next step. Do NOT Apply Config yet.
Create New Outbound Route
Navigate to Connectivity > Outbound Routes and create a new outbound route. This will be the route that actually passes the call to your trunk. You'll want to choose your normal Trunks in the Trunk Sequence for Matched Routes on the Route Settings tab. Then switch to the Dial Patterns tab. You'll only want to enter the *999 (or whatever you chose on the Misc Destination Dial field) in the Prefix field and a single dot ( . ) in the Match Pattern field.
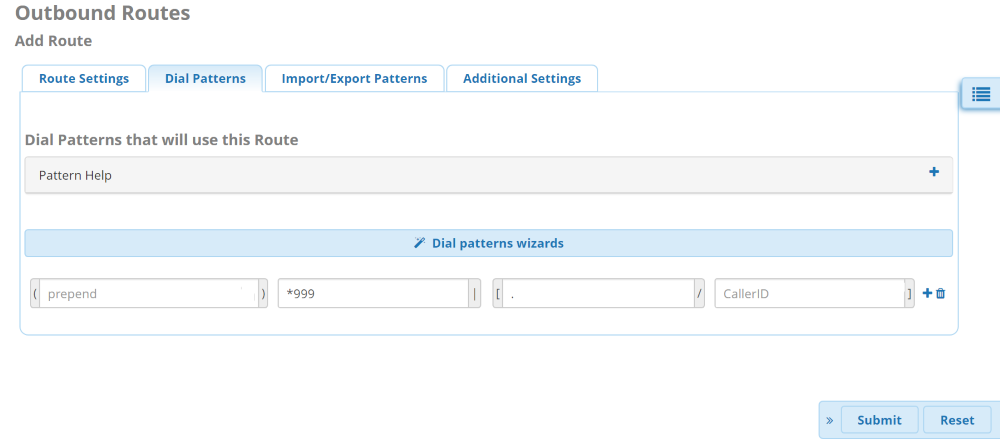
Once you have entered the information, Submit and move on to the next step. Do NOT Apply Config yet.
Edit Original Outbound Route
Now edit your ORIGINAL Outbound Route and remove the existing Trunk entries (choose the blank option at the top of the drop-down list) and change the Optional Destination on Congestion to Announcements and select the new announcement you previously created.
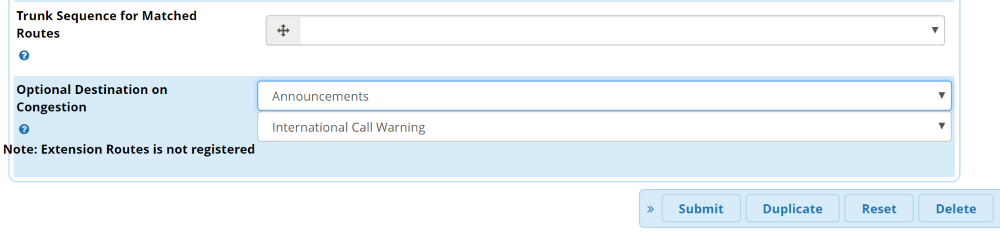
Once you have altered the original Outbound Route, you can Submit' and then you must now Apply Config'' for all of your changes to take effect.
Conclusion
Now outbound calls matching the Dial Patterns in the original route will trigger the announcement before passing the call to the trunk normally. This is how it works:
- When you place your outbound call, it is caught by the original Outbound Route using the usual Dial Patterns
- Because the trunk fields have been made blank, it will quickly fail-over to the Announcement with your message to the user
- The Announcement will then pass to the Misc Destination which will take their dialed number and add the *999 prefix needed to catch the Dial Pattern of the new Outbound Route
- The new Outbound Route then passes the dialed number to the Trunk after stripping the *999 that was added to trigger the route. To the end user, nothing changes with their usual dialing sequences