Table of Contents
Fixing issues with postfix External SMTP not sending
Introduction
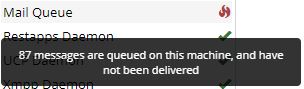
This guide is intended to help you address issues with the postfix email service and get emails sending properly. You can quickly see that messages are failing if you see a 🔥 icon next to the Mail Queue item on the Dashboard. Upon hovering your mouse pointer over the 🔥 icon, you are informed that there are undelivered messages in queue:
If the message you see upon hovering your pointer is instead a message stating that the service is not running, can't be started, or the status is unknown, you are likely instead suffering from the postfix permissions bug. You can remedy this by running:
smartupgrade fix-postfix
Running this will have no ill effects on your instance, even if you aren't suffering postfix service runtime issues. So, running this is a safe first troubleshooting step. Then proceed to the specific cases below.
Large volumes of emails via GMail/GSuite
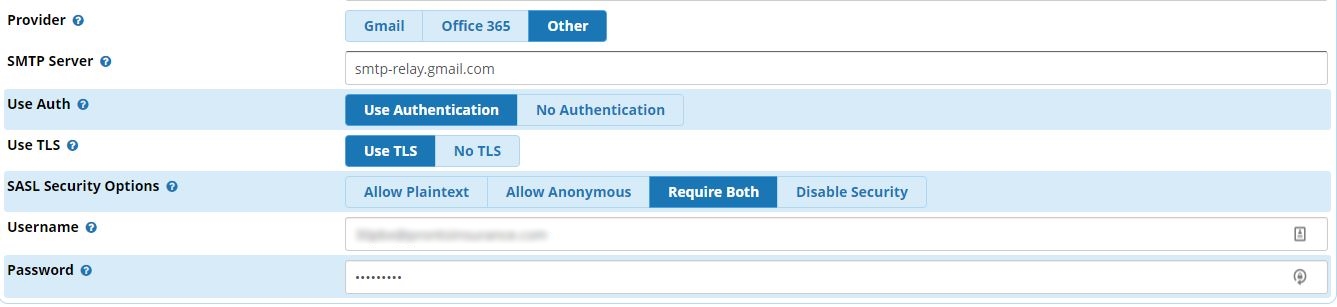
The default GMail/GSuite SMTP server utilized by the handy GMail provider button in the System Admin > Email Setup page is the standard low-volume server that only allows up to 2000 emails sent per 24 hour period per GMail/GSuite account (NOT ALIAS). If you are using GSuite and are expecting your sent email volume to exceed 2000 messages per day, you will need to utilize the Other provider, manually specify smtp-relay.gmail.com, Use Authentication, Use TLS, & Require Both SASL options. You may need to alter your GSuite permissions to allow use of the high-volume relay.
IPv6 doesn't work with all providers and postfix sometimes fails to switch to IPv4 properly
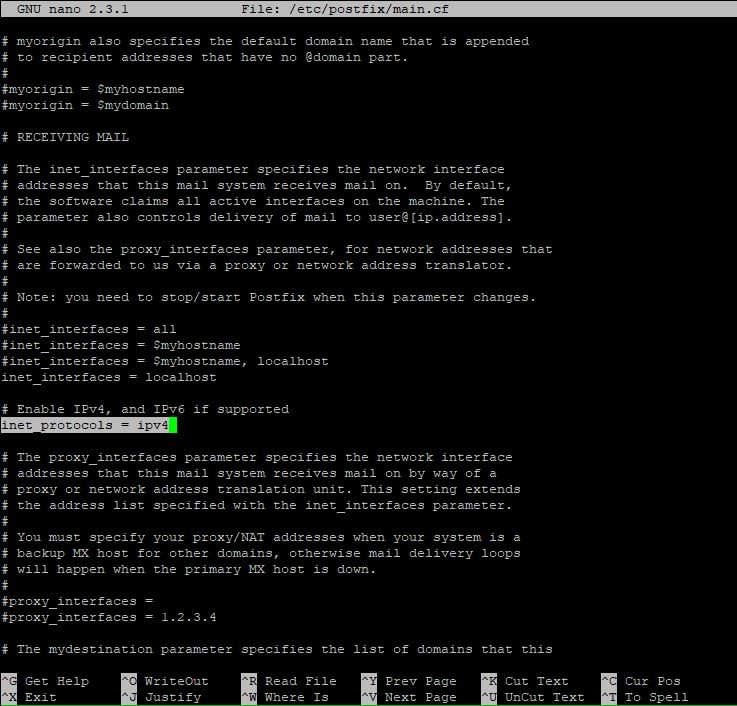
This seems to happen most often with Office365 but can happen with any provider. You will need to connect via SSH, run nano /etc/postfix/main.cf and find the parameter inet_protocols to change the value from all to ipv4 . This will force postfix to only send mail via IPv4.
Your email domain settings are not being respected, resulting in SASL Authentication errors with the provider
This appears to be caused by a yet undetermined bug in either postfix or the FreePBX routines calling the postfix service. There are numerous articles discussing this issue in the various FreePBX forums. If you are seeing messages bearing an incorrect email address as the sender with a SASL error when viewing stuck messages in the mail queue (by running the mailq command), you may need to connect via SSH and complete the following steps:
nano /etc/postfix/generic
- Go to the very end of the file (you can usually use the PgDn key to get there quickly)
- You'll want to add all the lines you see below AFTER you replace
emailfromaddressandreal-domain.comwith your correct email/authentication address:
root emailfromaddress@real-domain.com
root@localhost emailfromaddress@real-domain.com
root@localhost.localdomain emailfromaddress@real-domain.com
root@freepbx emailfromaddress@real-domain.com
root@freepbx.localdomain emailfromaddress@real-domain.com
asterisk emailfromaddress@real-domain.com
asterisk@localhost emailfromaddress@real-domain.com
asterisk@localhost.localdomain emailfromaddress@real-domain.com
asterisk@freepbx emailfromaddress@real-domain.com
asterisk@freepbx.localdomain emailfromaddress@real-domain.com
vm@asterisk emailfromaddress@real-domain.com
- OPTIONAL To rewrite the domain for ALL addresses from the PBX, use these at the bottom of the file, again replacing “real-domain.com” with your own domain:
@freepbx @real-domain
@freepbx.localdomain @real-domain.com
@localhost @real-domain.com
@localhost.localdomain @real-domain.com
- Use
Ctrl+oandEnterto save and thenCtrl+xto exit nano. Then edit one more file:
nano /etc/postfix/main.cf
- Add the following line to the end:
smtp_generic_maps = hash:/etc/postfix/generic
- Then run the following to commit changes and restart the postfix service:
postmap /etc/postfix/generic
service postfix restart