Table of Contents
Warm Spare HA
The latest versions of FreePBX support a very simple and competent Warm Spare strategy.
At the present time, the only way to achieve an automated fail over in the event of a random service failure is with Sangoma's Advanced Recovery module license. While the Advanced Recovery module will work with AWS FreePBX and we fully support its use, the $800/year ($400/server/year) licensing cost puts it out of budgetary reach for many small customers who will already be paying for two AWS FreePBX instances. The Advanced Recovery module is NOT AT ALL required to use Warm Spare HA strategies, as manually switching to the Backup instance is as simple as swapping the Elastic IP and, in some cases, enabling Trunks. This recludes the $800/yr Commercial Module for automated fail-over and sync-back. The choice is yours and you can switch to the Advanced Recovery module any time in the future.
This guide will show you how to setup Manual Warm Spare High Availability with AWS FreePBX.
Prerequisites
- 2 AWS FreePBX Instances, Primary and Secondary
- The Primary Instance can be a production instance already in use, or a newly launched deployment
- The Secondary Instance should be launched clean from the same major AMI version as the Primary Instance
Both Instances should be in the same Region so they can share the Elastic IP, but should be in different Availability Zones to ensure a single AWS AZ failure doesn't take down both Instances. Using a multi-Region schema requires a much more advanced setup that won't be covered in this guide.
Both Instances require independent Activation/Deployment IDs and identical sets of Commercial Modules Licenses from Sangoma - it is not possible to share a single Deployment ID between the Instances
- 1 Elastic IP address
- This should be Attached to the Primary Instance when you begin these steps
Using a Private IP or VPN schema requires a much more advanced setup that won't be covered in this guide
- 1 EC2 Security Group to be used on both Instances
- Needs to include access to TCP ports 22 and 80 granted to either the VPC Private Subnet CIDR (172.x.x.x) -OR- the Security Group ID (self-referencing) -OR- the Primary and Secondary Private IPs (two SG entries), allowing the Primary Instance to connect to the Secondary Instance to copy files and execute restore operations
Setup Guide
Throughout the steps below, we will be switching back and forth between the Primary and Secondary Instances in order to complete steps via both the GUI and SSH. To save time, have the GUIs of both Primary and Secondary Instances loaded/logged into your browser and establish a single SSH connection to the Secondary Instance.
Remember that a newly launched instance will have a GUI 'admin' password set to the Instance ID (I-xxxxxxxxxxxxxxx).
1: Obtain Primary Public Key from Primary Instance
- Navigate the Primary GUI to
Admin > Backup and Restore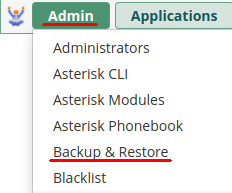
- Access the
Global Settingstab and copy the entire ssh-rsaPublic Keyfield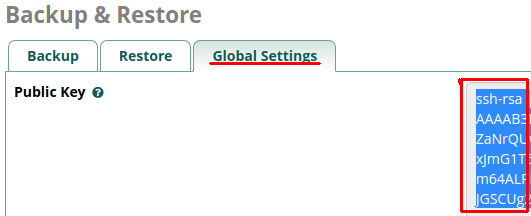
2: Install Primary Public Key on Secondary Instance via SSH
- Connect to the Backup Instance via SSH and edit
/root/.ssh/authorized_keyssudo su
nano /root/.ssh/authorized_keys
- On a new empty line, paste the entire ssh-rsa key you coped in Step 1 and ensure an empty new line remains at the very end of the file, then save and close the file with
Ctrl+o(letter O);Enter;Ctrl+x
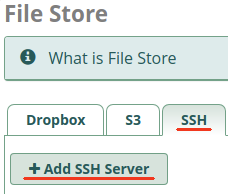
3: Create a new SSH FileStore on Primary Instance
- Navigate the Primary GUI to
Settings > FileStore, switch to theSSHtab, and clickAdd SSH Server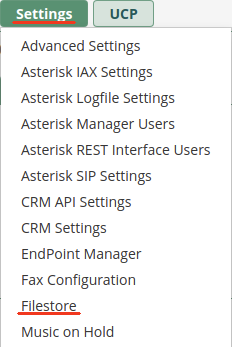
- Populate the fields to create a new SSH FileStore connection to the Secondary Instance and
Submit- Server Name =
Backup Node - Hostname = (Private IPv4 Address of Backup Instance)
- Port =
22 - Username =
root - Key =
/home/asterisk/.ssh/id_rsa - Path =
/var/spool/asterisk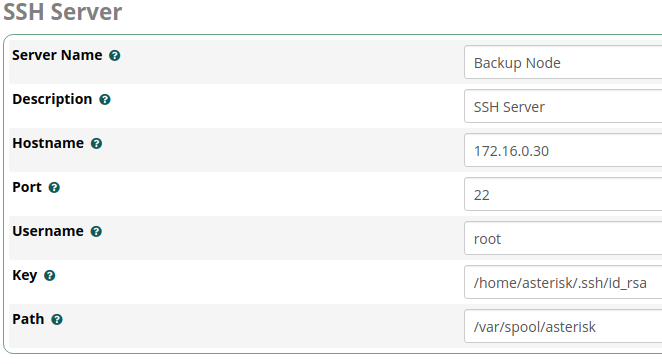
3a: (Optional) Create a second S3 FileStore on Primary
If you wish to keep an additional copy of your most recent backup file in an S3 Bucket, setup a second FileStore connecting to S3.
This is strongly advised, as it can help you can restore your config and data even if both Production and Backup Instances are somehow lost or damaged.
- If necessary, create a set of IAM credentials with Access Key ID and Secret Access Key. YOU MUST BE CERTAIN TO SAFEGUARD THIS INFORMATION AS IT GRANTS FULL ACCESS TO YOUR AWS S3 BUCKETS AND WOULD BE VERY DANGEROUS IN THE WRONG HANDS!!!
- On this page, you will click
Add User. Enter aUsername(this is for your reference only) and choose theProgrammatic Accessoption. Then select theAttach Existing Policies Directlytab and search for theAmazonS3FullAccesspermission. Once you click theCreate Userbutton on the last page, you MUST save theAccess Key IDandSecret Access Key(click the 'show' link) to setup the FileStore connection. You can also download this information in csv format for your records. If this information becomes compromised in the future, you can return to this page, delete the user, create a new one, and reprogram the FileStore with the new keys.
- If necessary, create a new S3 Bucket in the same region as your Production Instance to house your backup files
- Navigate the Primary GUI to
Settings > FileStore, switch to theS3tab, and clickAdd S3 Bucket - Populate the fields to create a new S3 FileStore connection to your desired Bucket and
Submit- Local Display Name =
FreePBX Backups - Bucket Name = (YourBucketName)
- Description = (optional)
- AWS Region = (Region you created the Bucket in)
- AWS Access Key = (Access Key ID you created)
- AWS Secret = (Secret Access Key you created)
- Path = (optional; if you wish to store within a sub-directory within the Bucket)

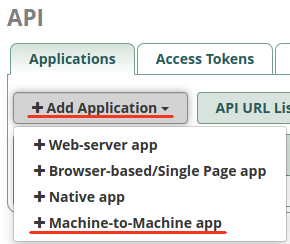
4: Create a new API Connection on Secondar Instance
- Navigate the Secondary GUI to
Connectivity > API, then clickAdd Application > Machine-to-Machine App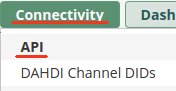
- Fill in
Your App NameandDescription, supplygql:backupin theAllowed Scopesfield, then clickAdd Application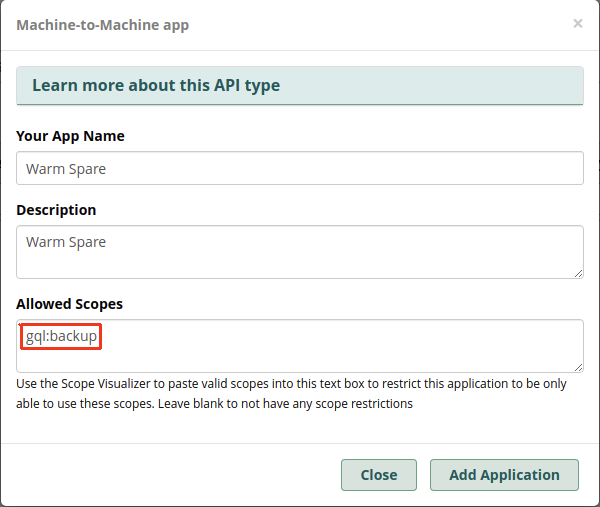
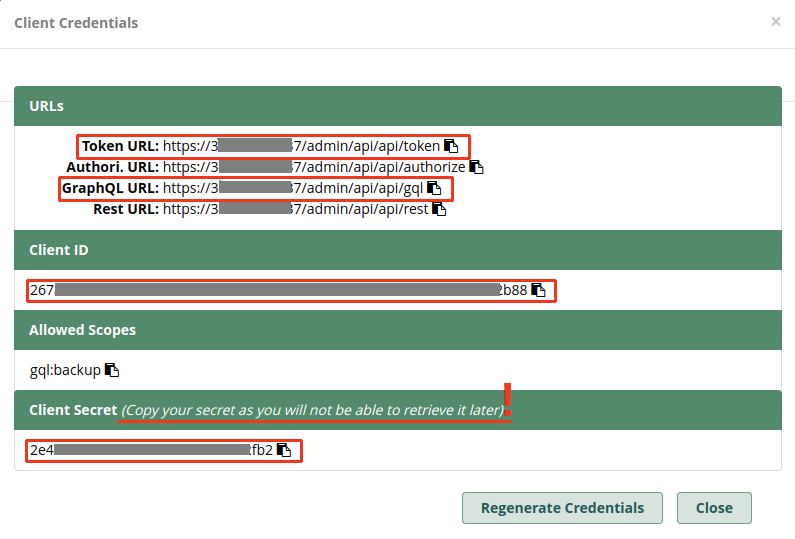
- You must now make note of the
Token URL,GraphQL URL,Client ID, andClient Secretfor use in the next step.YOU MUST BE CERTAIN TO SAFEGUARD THIS INFORMATION AS IT GRANTS READ/WRITE ACCESS TO YOUR FREEPBX BACKUPS AND WOULD BE VERY DANGEROUS IN THE WRONG HANDS!!!
5: Create a new Backup Job on Primary Instance
- Navigate the Primary GUI to
Admin > Backup and Restore, then clickAdd Backup 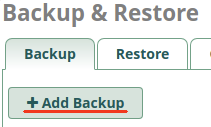
- Please note the following caveats for certain deployments:
- SIPSTATION Customers
- You will need a separate Trunk Group for each Instance
- You must set
Exclude Trunks=Yes - You must set
Modules > Core > Disable Trunks on Restore=Yes
- Registration-based Trunk Providers
- You may need separate Trunk connections/credentials for each Instance and set
Exclude Trunks=Yes - You may need to set
Modules > Core > Disable Trunks on Restore=Yes
- IP-based Trunk providers
- You should always send your incoming calls to only the Elastic IP, so only the active instance is receiving your calls
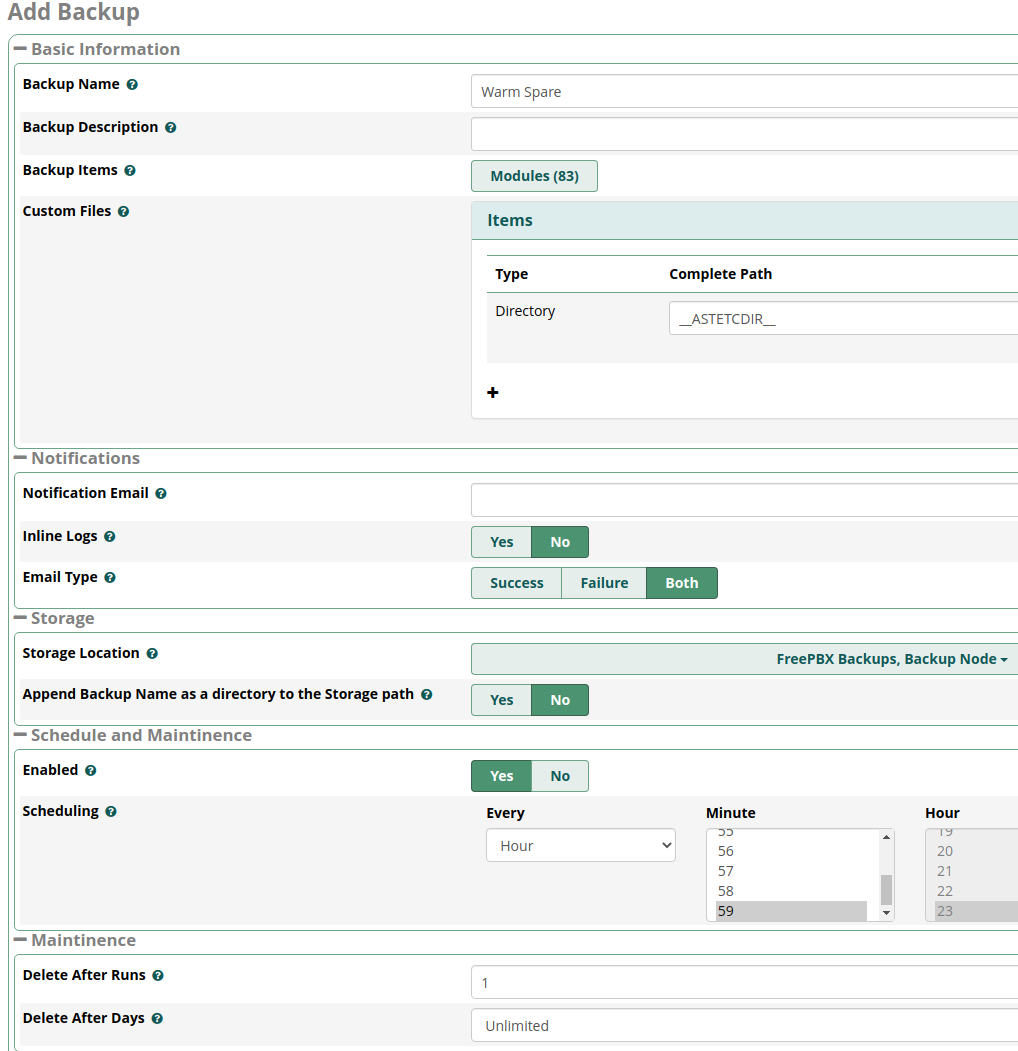
- Populate the fields and set the parameters of your Warm Spare backup job
- Backup Name =
Warm Spare - Click the Modules button and deselect the following modules:
Backup & Restore,FileStore,SIPSTATION(see caveats above!) - Leave the Custom Files (ASTETCDIR) Directory entry UNTOUCHED!
- Storage Location = check
SSH > Backup Node(also check S3 > FreePBX Backups, if setup in 3a*) - Schedule: Enabled =
Yes; Scheduling =Every Hour - Delete After Runs =
1 - Warm Spare - Enable =
Yes - Exclude CERTIFICATE settings =
No - Exclude NAT settings =
No - Exclude Bind Address =
Yes - Exclude DNS =
No - Apply Configs =
Yes - Exclude Trunks =
No(see caveats above!) - Connect Warm Spare Server Over =
API - Warm Spare Server =
Backup Node - Access Token URL = (from Step 4, substituting the private 172. IPv4 address)
- Client ID = (from Step 4)
- Client Secret = (from Step 4)
- GraphQL URL = (from Step 4, substituting the private 172. IPv4 address)
- Now click the Get Warm Spare Token button, which should populate the Client Access Token field if the connection is setup properly and the Backup Instance can be reached
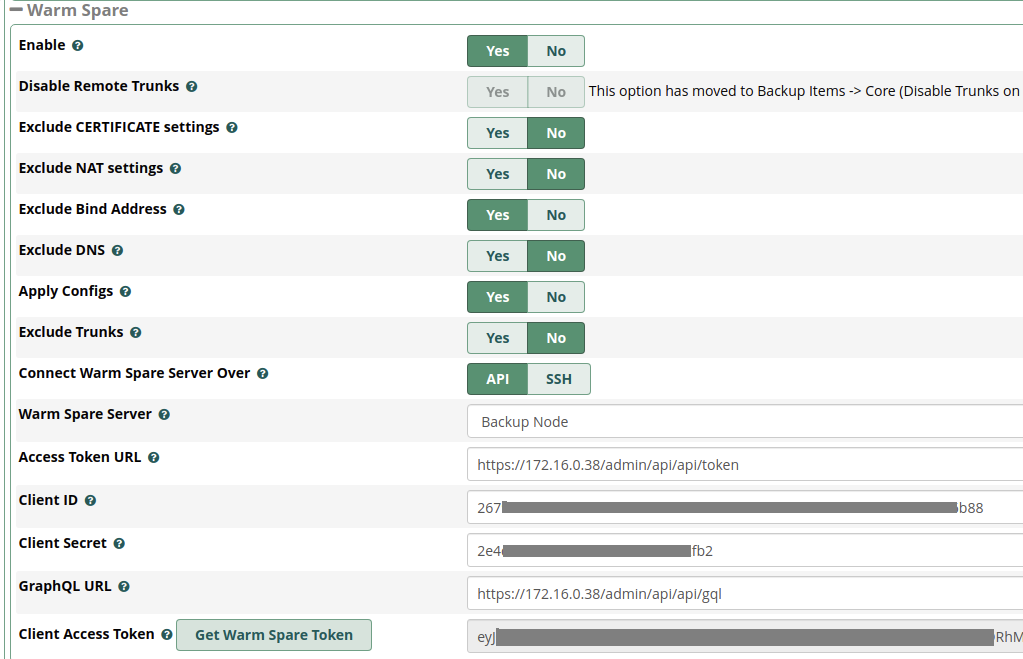 If you acquire the Client Access Token successfully, you may now
 Save the backup job.
6: Add Secondary Local Network to Primary Instance
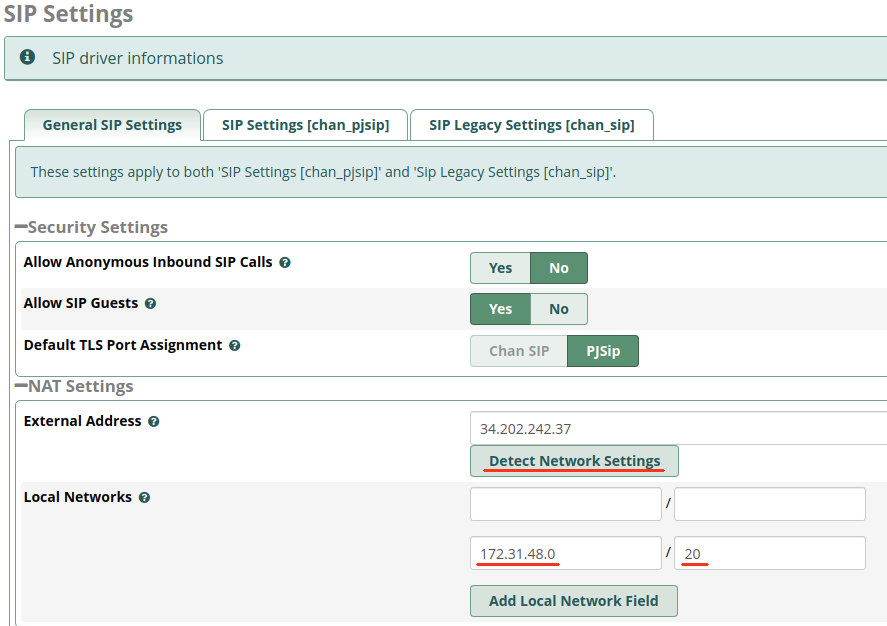
This step is necessary so, when a fail-over is performed, calls are routed over NAT correctly. First, navigate the Secondary Instance GUI to Settings > Asterisk SIP Settings
If the Local Networks field is empty, click the Detect Network Settings button to populate the fields. Then make note of the CIDR presented (usually 172.31.x.0 / 20)
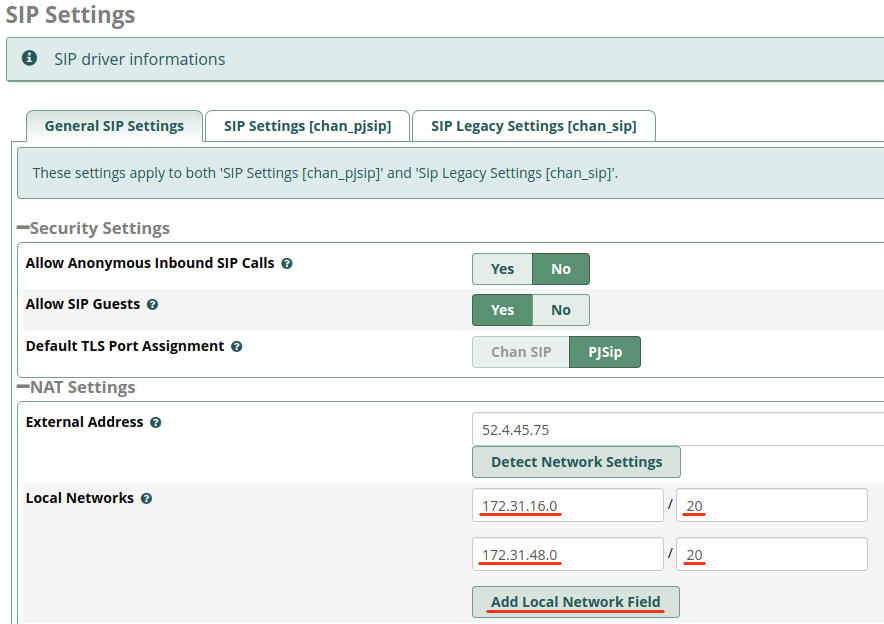
Navigate the Primary Instance GUI to Settings > Asterisk SIP Settings and paste the CIDR you copied from the Backup Instance or your VPC Subnet information. If an extra blank field is not showing, click the Add Local Network Field button. You should now have two sets of Local Networks showing, one for each Instance.
If you have both Instances in a single Availability Zone, they will have the same Local Network CIDR and you do not need to duplicate this entry in the list!
Your Warm Spare Setup is now complete. Data will be cloned from the Production Instance to the Backup Instance once per hour to keep it up-to-date.
The following sections cover additional information about Warm Spare High Availability Strategies, such as how to Fail Over and Upgrade your Instances.
How to Fail Over to the Secondary Instance
If your Production Instance fails for any reason or you need to keep call services active while you upgrade the Production Instance (24-hour offices, etc), switching to the Backup Instance is as simple as moving your Elastic IP to the Backup Instance via the EC2 Console or AWS APIs.
- If your Trunking setup necessitates disabling trunks on the Backup Instance, you'll also need to enable them once you've moved the Elastic IP to the Backup Instance
- Switching back to the Production Instance is completed in reverse: Disable Trunks on Backup (if necessary), then swap Elastic IP to Production Instance
How to Upgrade your Instance
If you need keep call services active during the upgrade, you may fail over to the Secondary Instance before proceeding
- Create a Machine Image backup of the 🔷Production🔷 Instance via the EC2 Console before performing any upgrades.
- This will allow you to quickly rollback the Production Instance if upgrades fail and break the instance. This is accomplished using the Replace Root Volume wizard on the EC2 Console
- Temporarily Disable the Schedule of the Warm Spare Backup Job on the Production Instance
- Navigate the GUI to
Admin > Backup and Restoreon the Primary Instance - Edit the Warm Spare job, change
Schedule EnabledtoNo, thenSave
- Run SmartUpgrade on the Primary Instance
smartupgrade –auto
If you failed over to the Secondary Instance to start with, you should switch back to Primary at this time
- Run SmartUpgrade on the Secondary Instance
smartupgrade –auto
- Re-Enable the Schedule of the Warm Spare Backup Job on the Primary Instance
- Navigate the GUI to
Admin > Backup and Restoreon the Primary Instance - Edit the
Warm Sparejob, changeSchedule EnabledtoYes, thenSave
How to Promote the Secondary Instance to Permanent Primary role
- Ensure the old Primary Instance can't interfere with the Secondary Instance by removing the old credentials from the Secondary Instance
- Remove the “ssh-rsa…” line from
/root/.ssh/authorized_keys:nano /root/.ssh/authorized_keys
- Remove the API Machine-to-Machine Application Connection from
Connectivity > API
- Switch over to the Secondary Instance
- Swap Elastic IP to Secondary Instance via the EC2 Console or AWS API
- Enable Trunks on the Secondary Instance, if necessary
The Secondary Instance is now your Primary Instance. Follow this guide from the start to setup a new Secondary Instance and restore redundancy.